
Every employer in Brunei Darussalam has to manage the risks their work creates. Section 12(3)(a) of the Workplace Safety and Health Act, Chapter 277 requires employers, so far as is reasonably practicable, to take the necessary measures to ensure the safety and health of persons at work. Regulations 3 and 4 of the WSH (Risk Management) Regulations go further: conduct a risk assessment, and eliminate foreseeable risks or, where elimination is not reasonably practicable, put effective controls in place.
The risk assessment is how you work out what those measures are. It is also one of the first documents SHENA will ask for.
This guide sets out how one is done. It is the same method we teach on IOSH Managing Safely and the NEBOSH International General Certificate, written for someone doing it for the first time.
A Hazard Is Not a Risk
These two words get used interchangeably and they mean different things.
A hazard is anything with the potential to cause harm. A drum of solvent. An unguarded belt. A wet floor. Working at height. Night shifts. The hazard exists whether or not anyone is near it.
A risk is the chance that the hazard actually harms someone, together with how bad that harm would be. The same drum of solvent is a low risk sealed in a locked store and a high risk being decanted by hand in an unventilated room.
This matters because you cannot remove every hazard. What you can do is reduce the risk. Getting the two confused leads to assessments that list hazards and stop, which is the most common fault we see.
Where to Look
People find the hazards they expect to find. Working through categories stops you seeing only the obvious ones.
- Mechanical — machinery, moving parts, vehicles, lifting equipment
- Physical — noise, vibration, electricity, working at height, and in Brunei, heat
- Chemical — solvents, fuels, cleaning products, welding fume, dust
- Biological — bacteria, mould, contaminated water, anything in food handling
- Ergonomic — manual handling, repetitive work, awkward postures, poor workstations
- Psychosocial — workload, long hours, isolation, bullying, fatigue
The last group is the one most often left out, and the one that most often causes the incident. A tired worker on a twelve-hour shift is a hazard the same way a frayed cable is.

The Five Steps
1. Find the hazards
Walk the job as it is actually done, not as the procedure describes it. Look at the work at shift change and at the end of a long day, not just mid-morning. Read your accident book and your near-miss reports. Check the safety data sheets for what is actually stored on site.
2. Decide who could be harmed, and how
Name the groups, not just “staff”. Contractors, cleaners, delivery drivers, visitors and members of the public all get exposed to your hazards without knowing your procedures. Give particular thought to young or new workers, anyone with a health condition, and pregnant workers.
Then say how the harm would happen. “Struck by reversing forklift” is useful. “Injury” is not.
3. Rate the risk
Score how likely the harm is and how severe it would be, then multiply. That gives you a number you can compare against other risks, and a basis for deciding what to fix first.
4. Decide the controls
Work down the hierarchy in the next section rather than reaching straight for gloves and a mask.
5. Record it, then review it
Write it down, tell the people it affects, and set a date to look again. An assessment nobody has read protects nobody.

Scoring the Risk
We use a five by five matrix. Rate severity from 1 to 5, rate likelihood from 1 to 5, multiply the two, and read the band.
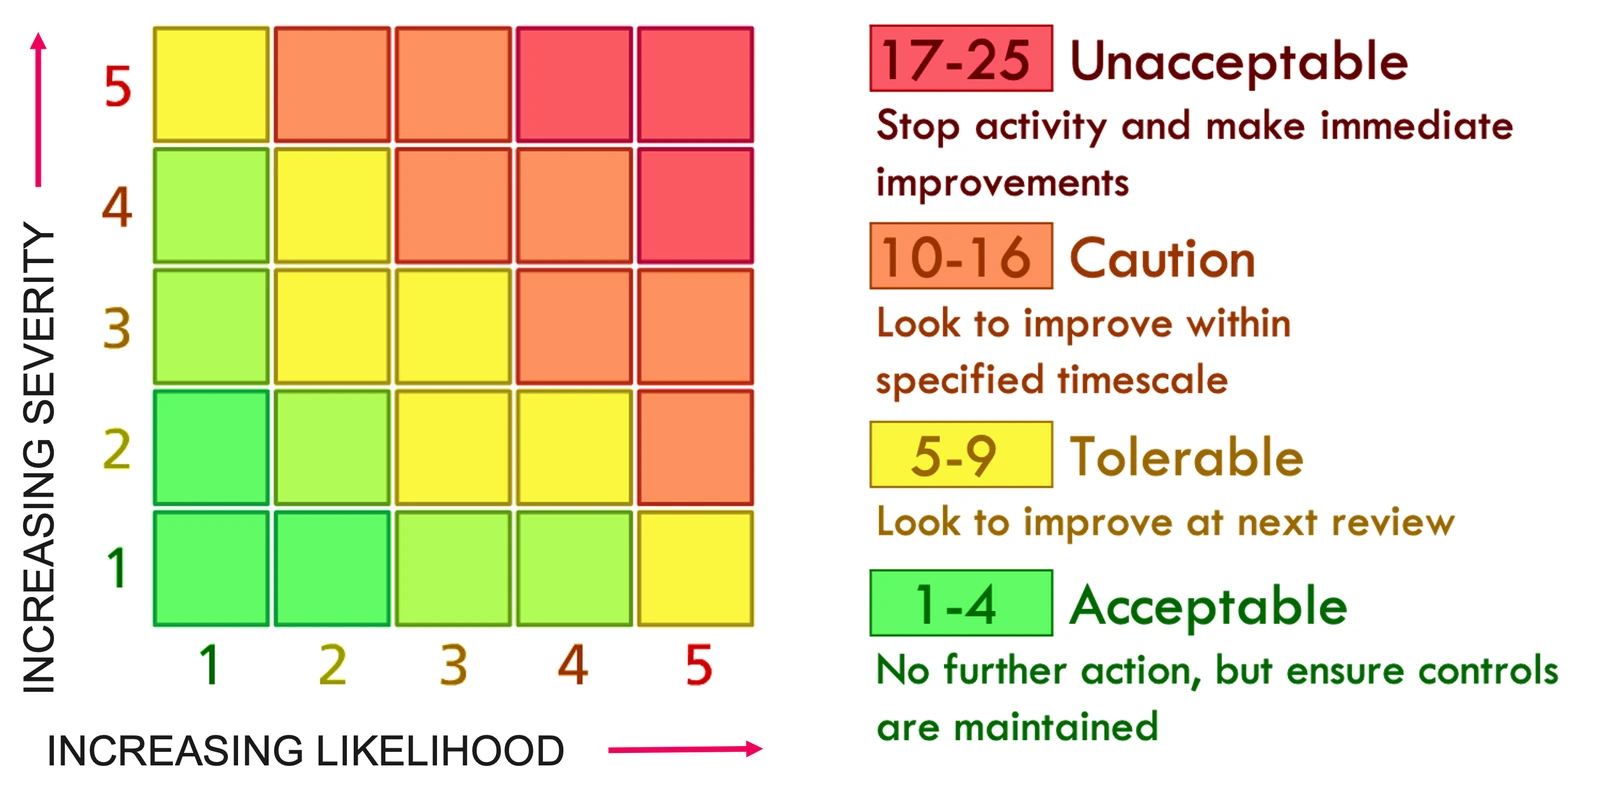
- 1 to 4 — Acceptable. No further action, but keep the existing controls working.
- 5 to 9 — Tolerable. Look to improve at the next review.
- 10 to 16 — Caution. Improve it, within a timescale you write down.
- 17 to 25 — Unacceptable. Stop the activity and fix it now.
Two things worth saying about the numbers. They are a way of ranking and communicating risk, not a measurement — two competent people may score the same job 9 and 12, and that is fine. And the score is meaningless without the reason: always record why you chose that severity and that likelihood.
Score the risk twice. Once as it stands today with whatever controls are already in place, and once as it would be after the controls you are proposing. The gap between the two is the argument for spending the money.
Choosing Controls
Controls are not equal. Work down this order and only move to the next step when the one above genuinely will not work.
- Eliminate — remove the hazard. Do the work at ground level instead of on the roof.
- Substitute — swap it for something less harmful. A water-based product instead of a solvent.
- Engineering controls — guard it, enclose it, extract it, isolate it.
- Administrative controls — procedures, permits, training, rotation, signage.
- Personal protective equipment — last, and never on its own.
The first three reduce the risk for everybody, every time, whether or not anyone remembers. The last two rely on people behaving as intended on their worst day. That is why PPE is at the bottom, not because it does not work.
Who Should Do It
A competent person leads it — someone with the training, knowledge and experience to recognise what they are looking at, and the standing to be listened to. Competence is specific: being competent to assess office work does not make you competent to assess confined space entry.
But it is not a solo exercise. Involve the supervisor who runs the area and the workers who do the job. For specialist hazards — noise exposure, ventilation, structural work — bring in someone who does that for a living.
When to Do It Again
- Before new work starts, or before a new machine, substance or process is introduced
- When the way the work is done changes, including changes of contractor
- After an accident or a near miss, whether or not anyone was hurt
- When something outside changes the risk — haze, flooding, a new regulation. SHENA’s notice 2026/WSHN/04 on hazy conditions is a recent example: it asks workplaces to review their risk assessment whenever air quality or official advisories change.
- Periodically anyway, so that nothing quietly goes out of date

Where It Usually Goes Wrong
- Copying a template. A generic assessment describes a generic workplace. Yours is not one.
- Listing hazards and stopping. The assessment is the controls, not the list.
- Assessing the procedure, not the job. Watch what people actually do.
- Controls with no owner and no date. An action without a name against it does not happen.
- Filing it. If the people at risk have not been told what came out of it, nothing has changed.
- Never reviewing it. An assessment from three years ago describes a workplace that no longer exists.
Risk assessment is a habit more than a document. Done properly it is how you find out what is likely to hurt someone before it does.